How to Format a Book for Amazon KDP in Adobe InDesign

Formatting a book for Kindle Direct Publishing or IngramSpark requires more than just good design, incorrect margins, inconsistent styles, or export settings can lead to rejected files or poor print results.

In this guide, you’ll learn how to use Adobe InDesign to set up and format a book properly, from creating flexible parent (master) pages to refining body text and layout.

By the end, you’ll have a structured workflow for producing a clean, professional, print-ready book file ready for upload to Amazon KDP

If you’d prefer guided, hands-on support, we run specialist training in book design using Adobe InDesign and Affinity Publisher, including workflows for Kindle Direct Publishing and Instagram Spark

View our book design courses for KDP publishing

How to Design a Book for Amazon KDP & Ingram in InDesign

Formatting a book for Kindle Direct Publishing requires more than simply exporting a PDF from Word. Getting the trim size, margins, bleed and export settings right is essential to avoid upload errors or unprofessional print results.

Adobe InDesign gives you precise control over your book layout. When set up correctly, it allows you to manage page numbering, apply consistent styles and produce a clean, print-ready PDF that meets KDP specifications.

This step-by-step guide shows you how to format your book professionally, from initial document setup through to final export.

Amazon KDP InDesign course

InDesign and Affinity Publisher Courses: Tools for Professional Book Formatting

At Greta Powell Training, we provide expert-led guidance to help you design and format your book with confidence, whether you prefer Adobe InDesign or Affinity Publisher (Affinity Studio). Both options follow the same comprehensive course content so you can master professional book layout and publishing workflows using the software that suits you best.

Explore our Adobe InDesign Training for Book Design Course

Explore our Affinity Publisher /Studio Training for Book Design Training

Set up the Correct Trim Size and Margins

Begin by confirming your final trim size (for example A5, 6 x 8). Bear in mind KDP uses imperial (inches) for setup. More about UK and USA page sizing. This determines your margins, spine width and overall layout.

When creating your document in Adobe InDesign:

  • Enable Facing Pages for book layout
  • Set appropriate inner margins (gutter) to allow for binding
  • Add bleed if images or backgrounds extend to the page edge
  • Always use confirmed specifications, don’t guess measurements


Incorrect margin settings are one of the most common causes of unprofessional-looking book interiors, particularly when printed through Kindle Direct Publishing.

Importing Your Manuscript into InDesign

If your manuscript is in Microsoft Word or Google Docs, use the File > Place command in Adobe InDesign to import it correctly. Avoid copy and paste, as this can introduce formatting issues that are difficult to fix later.

Before applying styles:

  • Remove manual line breaks
  • Eliminate extra spaces between words or paragraphs
  • Avoid using tabs for alignment
  • Check for overset text after placing the document


A clean manuscript is essential for producing a professional, print-ready book for Kindle Direct Publishing.

Why use the Place command in InDesign?

Using the Place command in Adobe InDesign creates a more stable workflow for long documents. It preserves the structure of your manuscript reducing formatting issues that often occur when copying and pasting large amounts of text.

You can also map paragraph and character styles from your Word document to InDesign, making it easier to apply consistent formatting and maintain your design system.

Useful shortcuts when placing text:

  • Shift + Click, Automatically flows text across multiple pages and creates new pages as needed
  • Shift + Alt + Click, Flows text into frames without adding new pages
  • Alt + Click, Lets you draw a custom text frame before placing content

Use Paragraph Styles Instead of Manual Formatting

Professional book layout depends on consistency and structure. Avoid manually adding spacing with repeated line breaks, this leads to inconsistent formatting and production issues.

Instead, create structured paragraph styles for:

  • Body text
  • Chapter titles
  • Subheadings
  • Extracts or quotations


Paragraph styles allow you to apply formatting consistently across your entire document and make global updates instantly.

In Adobe InDesign, styles control both character attributes (font, size, colour) and paragraph settings (spacing, alignment, indentation). Once defined, they can be applied to large sections of text in a single click.

This is essential when working on long documents, ensuring consistency and dramatically speeding up your workflow.

Working with Predefined Style Systems

Some workflows use predefined style sets (sometimes called style packs) to apply consistent formatting quickly. These can be customised to match your book design and help maintain a cohesive layout across chapters.

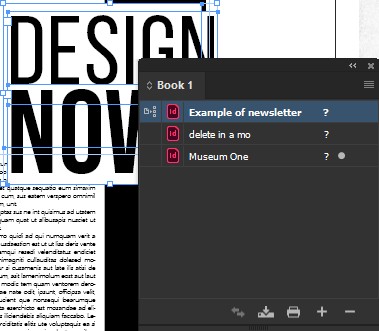
Using the Book Panel for Long Documents

Formatting Books for Amazon KDP - the Book Panel in InDesignAdobe InDesign’s Book pane is a great time saver and management tool. It helps immensly when Formatting Books for Amazon KDP especially when broken down into *Chapters in the panel.

Chapters not to be confused with chapters in the book itself. This is what the book panel refers to the multiple files it collates and manages.

The Book Panel in Adobe InDesign is perfect for long documents like novels and in this instance KDP publications. One massive file can be broken down into smaller, easier to manage chapters while maintaining global consistency.

It also lets you update styles etc across multiple files with a single click.
Use Parent Pages and Automatic Page Numbering

Just to clarify InDesign Parent Pages were originally called Master Pages and are a major part of getting book numbering to work properly.

Never type page numbers manually

Instead!

  • Insert automatic page numbers on master pages
  • Use sections for Roman numerals in front matter
  • Restart numbering at Chapter 1 if required


This ensures your pagination remains accurate even if pages shift during editing.

Another point to this is if you manually number the pages and then have to randomly delete some you’re tasked with going through the pages and re-numbering manually again. Not to good when you’re dealing with 100 plus pages. 

Generate Automatic Table of Contents (TOCs)

An automatic Table of Contents will be based on the paragraph styles created throughout your document in particular any heading styles that are pertinant to the TOC. Once you’ve built the TOC you can even design a style for the TOC itself.

Do not type the Table of Contents manually always use an automatic TOC:

  • Updates when pagination changes
  • Maintains structure
  • Supports professional publishing standards

Preparing Images and Graphics for Print

If this is going to be a print book, POD (Print on Demand) then:

  • Use 300 dpi images
  • Confirm the colour space is suitable
  • Extend images to bleed if required
  • Review resolution in the Links panel


Low resolution images can ruin an otherwise well-formatted book.

Preflight before Exporting

Before exporting your PDF, use the Preflight panel to check:

  • Missing fonts
  • Overset text
  • Image resolution
  • Colour issues


Skipping Preflight is a risk no professional designer takes.

Exporting a Print Ready PDF for Amazon KDP

When exporting:

  • Choose PDF (Print)
  • Select a PDF/X preset
  • Include bleed if required
  • Embed fonts
  • Review the final PDF thoroughly


Always inspect your file before uploading to KDP.

Common KDP Export Issues to Avoid

  • Bleed, if images extend to the edge make sure you have 0.125″ bleed.
  • Do not ignore Inner Margins, small inner margins make text unreadable near the binding.
  • Correct Export: Using low-resolution PDF settings will cause rejection

Key Book Terminology Every Author Should Know

It’s all really fab stuff and probably impossible to include everything on this post but to give you an idea of the more important and common terms, see below

Book Anatomy and Structure

Book Block

  • Book Block: The assembled, trimmed pages of a book before they are bound.

Case /Boards

  • Case/Boards: The rigid cover of a hardback book.

Dust Jacket /Wrapper

  • Dust Jacket/Wrapper: A removable paper cover protecting a hardback.

End Papers

  • Endpapers: The pages glued to the inside cover (pastedown) and the first/last free pages (flyleaf).

Spine

  • Spine: The backbone of the book where pages are bound.

Folio

  • Folio: The page number, or a large book size.

Head and Tail

  • Head/Tail: The top and bottom edges of the book.

Fore Edge

  • Fore-edge: The edge opposite the spine.

Page Layout and Typesetting

Gutter

  • Gutter: The blank space or inner margin between two facing pages where they are bound.

Safe Area /Margin

  • Safe Area/Margin: The area inside the trim line where text/content is safe from being cut or hidden in the gutter.

Bleed

  • Bleed: Design elements extending beyond the final trim edge (usually 3mm or 0.125 inches) to prevent white borders.

Justification

  • Justification: The alignment of text (left, right, centered, or justified).

Kerning

  • Kerning: The adjustment of space between specific pairs of letters.es)

Leading

  • Leading (Line Spacing): The vertical space between lines of text.

Widows and Orphans

  • Orphans/Widows: A word or short line at the beginning or end of a paragraph that is separated from the rest of the text, often appearing alone at the top or bottom of a page.

Signature

  • Signature: A large sheet folded to form a group of pages (e.g., 16 or 32 page)

Cover Design Terms

Dust Jacket

  • Dust Jacket (Dustwrapper): A removable paper cover on a hardcover book.

Spine

  • Spine: The part of the book that faces outward on a shelf.

Blurb

  • Blurb: The promotional text on the back cover or inside flap.

Blind Emboss

  • Blind Emboss: A design or text impressed into the paper without

Adobe Book Design in InDesign Training Course

We follow a simple proven process to make sure all our training courses deliver the best results.

  1. First we listen to you and what you want!

  2. Initial consultation, You’ll discuss your goals, current skill levels, and the types of projects your team handles via Zoom /Teams

  3. Tailored training plan, Greta designs a custom learning path using your software, files, and creative objectives.

  4. Flexibility, tailored training can be held online, at your premises, an agreed location or in hybrid format scheduled around your diary.

  5. Follow-up support, After training, you’ll receive support by email, video and optional refresher sessions to keep skills sharp.

Would you like some guidance in publishing your book?

Our Adobe InDesign Book Design Training Course gives authors and self-publishers the skills to:

  • Format manuscripts correctly.

  • Structure long documents.

  • Export professional print-ready PDFs.

  • Publish confidently to Amazon KDP or other print-on-demand platforms.

Get in touch with Greta Powell Training today to discuss your team’s needs or arrange a free consultation.

Contact Greta Powell Training

Want to Read more?

Adobe CC and Affinity Studio 3, which to use

Switch from Adobe to Affinity

Can your company switch from Adobe to Affinity ? Switching from Adobe to Affinity? Why more organisations are questioning using

4 responses