Photoshop Timeline Video Editing
It all seems go with video editing at the moment at Greta Powell Training especially with Premier Pro. However for some Premier may be overkill, there are many people who just want to produce, edit and publish small videos without encountering a steep learning curve. Which is where Photoshop comes into its own with its very own Motion Workspace. In the Photoshop Timeline video editing is straightforward, easy to learn and if you own Photoshop comes at no additional expense.
For much of its existence Photoshop has been able to produce frame based animations but CS6 really saw the turnaround when it became a ‘fully fledged’ video editor.
Creating a Photoshop Video
Photoshop comes with its own timeline built in where you can drag in clips, layers and transitions to create powerful videos for marketing, tutorials, interviews and podcasts. To initiate video editing either turn on the Motion Workspace or activate the Timeline from the Window Menu (Window Menu >Workspaces >Motion or Window >Timeline). The Photoshop Timeline will then appear at the bottom of the screen.
Everything Video works on the Timeline regardless of whether its a Frame based animation, a simple GIF or full video such as MPG or Quicktime. Once the various clips are positioned on the Timeline effects, opacity and filters can be added in much the same way as with photographs.
Once the Photoshop Timeline is active click the downward facing arrow next to Create Frame Animation to choose the type of video you want to work with.
Photoshop – Two Animation Modes
There two quite different modes to choose from when working on the Photoshop Timeline, the Frame Mode and the Video Timeline Mode and they both have two quite distinctive uses. Frame mode would be used to created frame based animations such as GIF’s whereas the Video Timeline lets you make edits to video’s.
Once the Animation mode has been selected the relevant timeline will appear and you can begin to either edit an existing video or create a new one from scratch.
Adding a Video to the Timeline
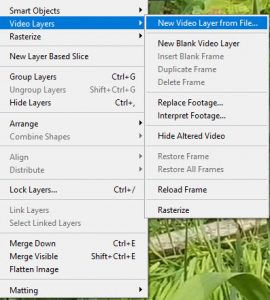
Click on ‘Video Layers
Select ‘New Video Layer from File’
Navigate to the required video file
Select the file and click OK
The Video will now appear as a clip on its own layer on the Photoshop Timeline
Add Text to the Video and this will also appear as a clip on the Timeline.
Any clips on the Timeline work the same as layers in Photoshop. The top, or above layer will obscure any other layers underneath. The Timeline ‘layers’can be dragged and dropped in a stackng order in exactly the same way as is done in the Layers Panel.
Clips can be positioned on the Timeline by dragging and dropping from their beginning or end.
View the Video Timeline.
Exporting Video to MP4
It is easy to export video from Photoshop into MP4 format playback – simply:
Go to the Render Video box >Select QuickTime Export >Choose MPEG4
In the Export Settings box >Choose MP4 or MP4 (ISMA) from the File Format
Under Video Specifications
Thank you for visiting.
Don’t have a good day, have a great one


